[Updated]
First please properly connect all power connectors of the components to the power supply unit, also note that it is important to provide proper and sufficient power solution to the system and it is highly recommended to provide higher power output around 100 watt more than the minimum power required for the system as well as to provide proper and sufficient ventilation,
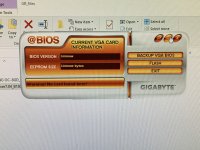
After that clear the CMOS of your motherboard and update its bios to the latest version and please do not put PCI-e Configuration on Auto and set each slot to pcie 3.0 or 3.1 if supported, if not then set to pcie 2.0 or 2.1, and check, then,
1- Turn off completely or disable any overclocking programs like MSI after burner or AMD Wattman after returning to default settings first and boot to windows safe mode, and reflash the appropriate Gigabyte unlocked vbios attached kindly below whether for Samsung memory or Micron memory,
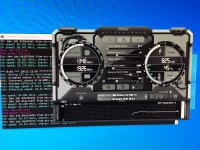
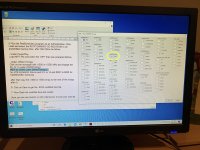
Hi, I am failing to update Gigabyte 5700 XT. The same procedure updates the BIOS on MSI cards with no problem. I follow the instructions on Igors Lab. The sign of having trouble with the card bios flash shows in GPU-Z. After flash using amdvbflash the values of GPU and memory frequencies is...

www.igorslab.de
or the backed up original vbios with AtiFlashTool 2.93+, copy the link below and paste in the browser to download,
How to reflash the VBIOS of your graphics card ?
- By Windows:
I. Extract the downloaded AtiFlashTool v2.93+ and put it with the Gigabyte vbios or the backup vbios file to a folder and put it in drive C,
II. Boot to Windows Safe Mode,
III. Open Command Prompt CMD as an administrator and navigate to the folder mentioned above,
IV. Now enter these commands below:
amdvbflash.exe -i
Press Enter
It will show you the gpu adapters list occupying the pcie slots for an example if there is only one gpu then its adapter number will be 0.
###########
amdvbflash.exe -unlockrom 0
Press Enter
It will unlock the vbios chip for flashing if it is locked.
###########
amdvbflash.exe -s 0 chooseAname.rom
Press Enter
To make a backup of the vbios if needed.
###########
amdvbflash.exe -p 0
Gigabyte.vbios.rom or BackupBiosName.rom
Press Enter
To flash the vbios, here -f to force the flash in case of error.
###########
V. Wait for the update to complete and reboot.
- By FreeDOS (for flashing original vbios only):
I. First disable secure boot in bios settings,
II. Download Rufus program from the official link below, and make a FreeDOS bootable USB flash drive,
Rufus is a small application that creates bootable USB drives, which can then be used to install or run Microsoft Windows, Linux or DOS. In just a few minutes, and with very few clicks, Rufus can help you run a new Operating System on your computer...
rufus.ie
III. Download the Amdvbflash_DOS v4.68 from the link below, and extract the amdvbflash.exe and put it with the the backup of the original vbios file in the FreeDOS bootable USB flash drive, the USB flash drive must be connected to a USB 2.0 port,
IV. Reboot and press f12 until a boot list appear and choose the bootable usb flash drive,
V. Now use the same commands mentioned above.
VI. Reboot.
2- Download latest MorePowerTool and RedBiosEditor from below,
New curve options have been added. Of course we would be very happy about a feedback in the forum about the use of this new function! The More PowerTool (MPT) has been also revised once again for the…

www.igorslab.de
3- After the installation of both MorePowerTool and RedBiosEditor, run MorePowerTool as an Administrator and select your GPU card from the drop down menu and click Load or click Load then choose the vbios file that you want to modify, then apply the below settings which are best for performance, power consumption and safe 24/7 operating, after that click on Save to get the .MPT file,
- Under Features tab, set:
Zero RPM: Uncheck (Disable, for those who have high memory temperature)
- Under Feature Control (For stable Hashrate and to prevent hashrate from dropping to 0 MH/s in addition to disable R6 Render Standby in the motherboard bios settings if exists), set:
DS_GFXCLK: Uncheck (Disable)
ACDC: Check (Enable)
[To disable unwanted output ports or to make the card headless in order to save power and free lanes, choose any of the below,
VCN_PG: Uncheck (Disable, to disable the HDMI port)
JPEG_PG: Uncheck (Disable, to disable the display ports)
ATHUB_PG: Uncheck (Disable, to disable all the output ports and turn the card to headless)],
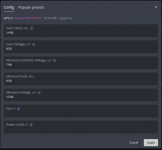
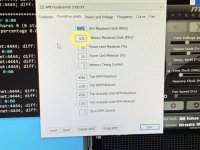
- Under Overdrive Limits tab, set:
GFX Maximum Clock 1440 MHz
Memory Maximum Clock 960 MHz
Power Limit Maximum 0%
Power Limit Minimum 0%
Memory Timing Control: 1 [For computing (mining), default is 2 for gaming]
Zero RPM Control: 0 (For those who have high memory temperature)
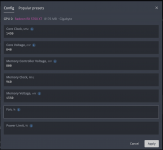
- Under Power and Voltages, set:
Maximum Voltage GFX: 1050 mV
[must not be lower than this as the MVDD default value in the vbios is at 1350 mV and the VDD must be within 300 mV range with MVDD or components may get degraded and permanent damaged]
Maximum Voltage SoC: 1050 mV
[must not be lower than this like the Maximum Voltage GFX]
Minimum Voltage GFX: 750 mV (800 mV for non XT)
Minimum Voltage SoC: 750 mV (800 mV for non XT)
Power Limit GPU: 155 W (145 W for non XT)
TDC Limit GFX: 135 A (125 A for non XT)
TDC Limit SoC: 15 A
- Under Frequency tap, set:
GFX Maximum: 1270 MHz
Memory DPM 3: 900 MHz
[Regarding SoC Maximum, must be kept at default 1267 MHz in the vbios, capping it at another value must be done inside the OS using a script in linux or editing the registry using MorePowerTool in Windows and at your own discretion, recommended values for memory types at specific clocks as below,
Memory Clock - - - > SoC Maximum,
910 (1820) MHz - - - > 1086 MHz (Samsung & Micron),
950 (1900) MHz - - - > 1267 MHz (Micron, here the default 1267 MHz is preferred),
- Under Fan tab, set:
Zero RPM Enabled: Uncheck (Disable, for those who have high memory temperature)
Stop Temperature: 50° C
Start Temperature: 60° C
4- Now run RedBiosEditor as an Administrator, click Load and choose the vbios, under PowerPlay tab load the .MPT file and under VRAM Timings tab you have to choose one from the 2 options below when editing the timings,
Option 1 (Preferable and Recommended), applying Apple Inc. vram timings straps linked below, once for MT61K256M32 Micron, and Save the vbios after that load the saved vbios and once again apply the straps for K4Z80325BC Samsung if it is existed and save the vbios again,
Option 2 (Universal), applying vram timings as below for both Samsung and Micron like before,
- K4Z80325BC (Samsung)
2000 MHz (Copy) - - - > (Paste) 2250 MHz
1800 MHz - - - > 2000 MHz
(1500 or 1550) MHz - - - > 1800 MHz
- MT61K256M32 (Micron)
1875 MHz - - - > 2000 MHz
1750 MHz - - - > (1800 - 1875) MHz
(1500 or 1550) MHz - - - > 1750 MHz
Memory Clock - tREF
[The recommended ratio is 3.9 and max at 4, for an example, 3900 tREF ÷ 1000 MHz = 3.9]
1000 MHz - 3900 (Samsung & Micron)
1250 MHz - 4875 (Samsung & Micron)
(1500 or 1550) MHz - (5850 or 6045) (Samsung & Micron)
1750 MHz - 6825 (Micron only)
1800 MHz - 7020 (Samsung & Micron)
1875 MHz - 7315 (Micron only)
2000 MHz - 7800 (Samsung & Micron)
2250 MHz - 8775 (Samsung only)
5- Save the vbios and reflash it like how you reflashed the backup one above.
6- Install HiveOS on an SSD and not USB flash drive and set it up properly, after that apply the below,
In HiveOs, first note down the default gpu parameters then follow the below,
- Core parameters,
Keep the ratio of Core clock to VDD at 1.79 or below (preferred is 1.75 and default is 1.70) as beyond that negative scaling may start which means lowering performance and occurring instability and increasing temperature.
- Memory parameters,
~ Samsung (K4Z80325BC-HC14),
Memory clock at 900 MHz more than this may not be stable,
~ Micron (MT61K256M32JE-14),
Memory clock at 900 MHz for power saving and lower temperature like for Samsung memory and 935 or 950 MHz for performance,
~ Hynix (H56C8H24AIR-SC),
Memory clock at 900 MHz for power saving and lower temperature, for performance 935 or 950 MHz,
[*Disclaimer regarding the memory temperature to avoid and prevent its degradation and being baked again that might lead to connection loose,
For Samsung (K4Z80325BC-HC14),
For operating at 24/7, the temperature must not exceed 74° C,
Other than this will fall under the below,
At (80 ± 5)° C, operating for 24/7 requires putting the system on a break of 1 to 2 hour (depending on the ambient temperature) after 48 hour of operation,
At (100 ± 5)° C, operating for 24/7 requires putting the system on a break of 1 to 2 hour (depending on the ambient temperature) after 36 hour of operation,
At (125 ± 5)° C, operating for 24/7 requires putting the system on a break of 1 to 2 hour (depending on the ambient temperature) after 24 hour of operation,
For Micron (MT61K256M32JE-14) and Hynix (H56C8H24AIR-SC), it is the same as for Samsung (K4Z80325BC-HC14) even thought Micron Inc. and SK Hynix stated it can run from (0 to 95)° C, however this is for normal use and not for 24/7 of operation].
Due to air cooling is being used, the highly recommend approximate setting as below,
[For optimal hashrate, keep the gap between the core clock and memory clock at 480 MHz]
[The recommended and safe ratio between VDDCI and Memory clock is 2.24 (Default is 2.06) For Samsung, Micron and Hynix, for example: 1800 (900*2) MHz ÷ 805 = ~2.24]
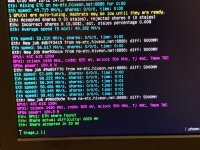
Core clock, VDD : Memory clock, VDDCI, MVDD, TeamRedMiner Mode A Hashrate
~ Samsung and Micron,
- 1370 MHz, 770 or 780 mV : 890 (1780/2) MHz, 850 mV, 1310 mV, ~54.40 MH/s,
- 1380 MHz, 780 or 790 mV : 900 (1800/2) MHz, 850 mV, 1310 mV, ~55.30 MH/s,
~ Micron,
- 1415 MHz, 795 or 805 mV : 935 (1870/2) MHz, 875 mV, 1350 mV, ~57.10 MH/s,
- 1430 MHz, 805 or 815 mV : 950 (1900/2) MHz, 875 mV, 1350 mV, ~58.10 MH/s,
7- Reboot the system,
8- Test and record the results.
You may have a good day,
Best Regards.
")