Practice Reviews Software

Windows 10 hangs on boot after reinstall? Workaround for faulty partition manager in Setup | Practice

Who doesn’t know the ugly moment when you think you’ve almost finished the Windows setup and then suddenly the new machine gets stuck? You have partitioned the SSD accordingly, defined the partition for the installation, put everything on it, the setup starts the services, thinks to have prepared everything and then after the next, due reboot you just get stuck at the same place again and again? If you move the mouse, you can see the cursor, but the nice little circles of the progress bar are like frozen (see picture)?

The whole thing happened to me yesterday already for the second time and I despaired then, the first time. I sunk hours into getting the setup ready and still failed over and over again in the beginning. But the problem is neither my PC in general, nor the SSD in particular. The problem is with Windows itself and the shortcomings of the partition manager in the installer. What exactly happened? I had two SSDs out yesterday for my new gaming table, but then unfortunately this problem occurred again. Both of them, mind you.

One SSD already had an older Windows 10 installation (2019), but not in UEFI mode, and the other was a cheap buy from a warehouse deal that still looked unsuspicious at first glance. While the partition manager of the used SSD showed me the old partitions, the obviously refurbished SSD showed a single partition, which was probably originally created to store data. A typical warehouse deal, where you also get used things foisted on you. However, both were not SSDs from a UEFI or GPT system.

If you deleted the old partitions and then applied the new, UEFI-compliant partitioning, everything still looked completely unsuspicious (see icon image below)

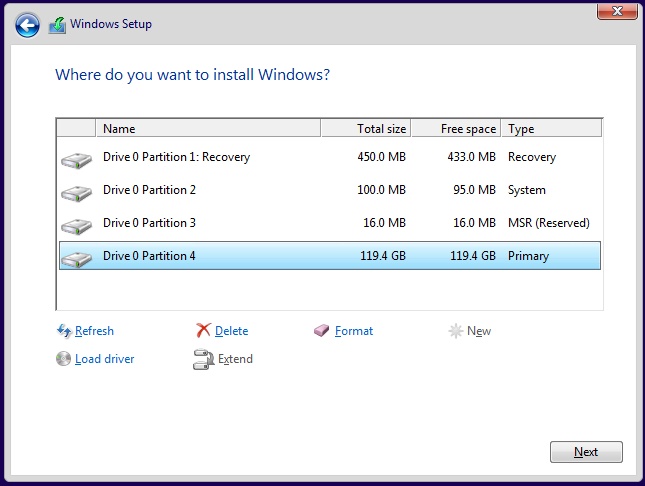
The installation went on without errors and without suspicion for the time being. Services were started and everything was “prepared”. Always after the then due reboot and before Windows could continue the installation with the usual queries for user, system and security, was the end of fun. Freeze de luxe! Well then? If you don’t happen to have a really unused SSD at hand, you will probably despair at first. The assumption that the partition manager of the Windows setup really resets and repartitions everything is unfortunately wrong.

Workaround the hard way

If you don’t have any paid programs for resetting and partitioning, but you have the possibility to clone a smaller or at least equally large SSD with a freeware tool of your choice, then you have in fact already won. It doesn’t matter if you clone the system hard disk of another UEFI system or even an empty data SSD in case of emergency, the main thing is that everything including the old MBR (Master Boot Record) is overwritten first!

After that, you can use this SSD to perform the normal Windows installation and, most importantly, complete it successfully. I admit, the error is rare because the constellation with an old CSM system or a messed up used SSD occurs rather rarely. But once you are faced with this problem, the solution is really tricky. However, even for this workaround you need a second PC first. In an emergency (which always saves me the hassle of installation), you have an external NVMe drive enclosure for the USB-C at hand. This saves nerves and above all time.

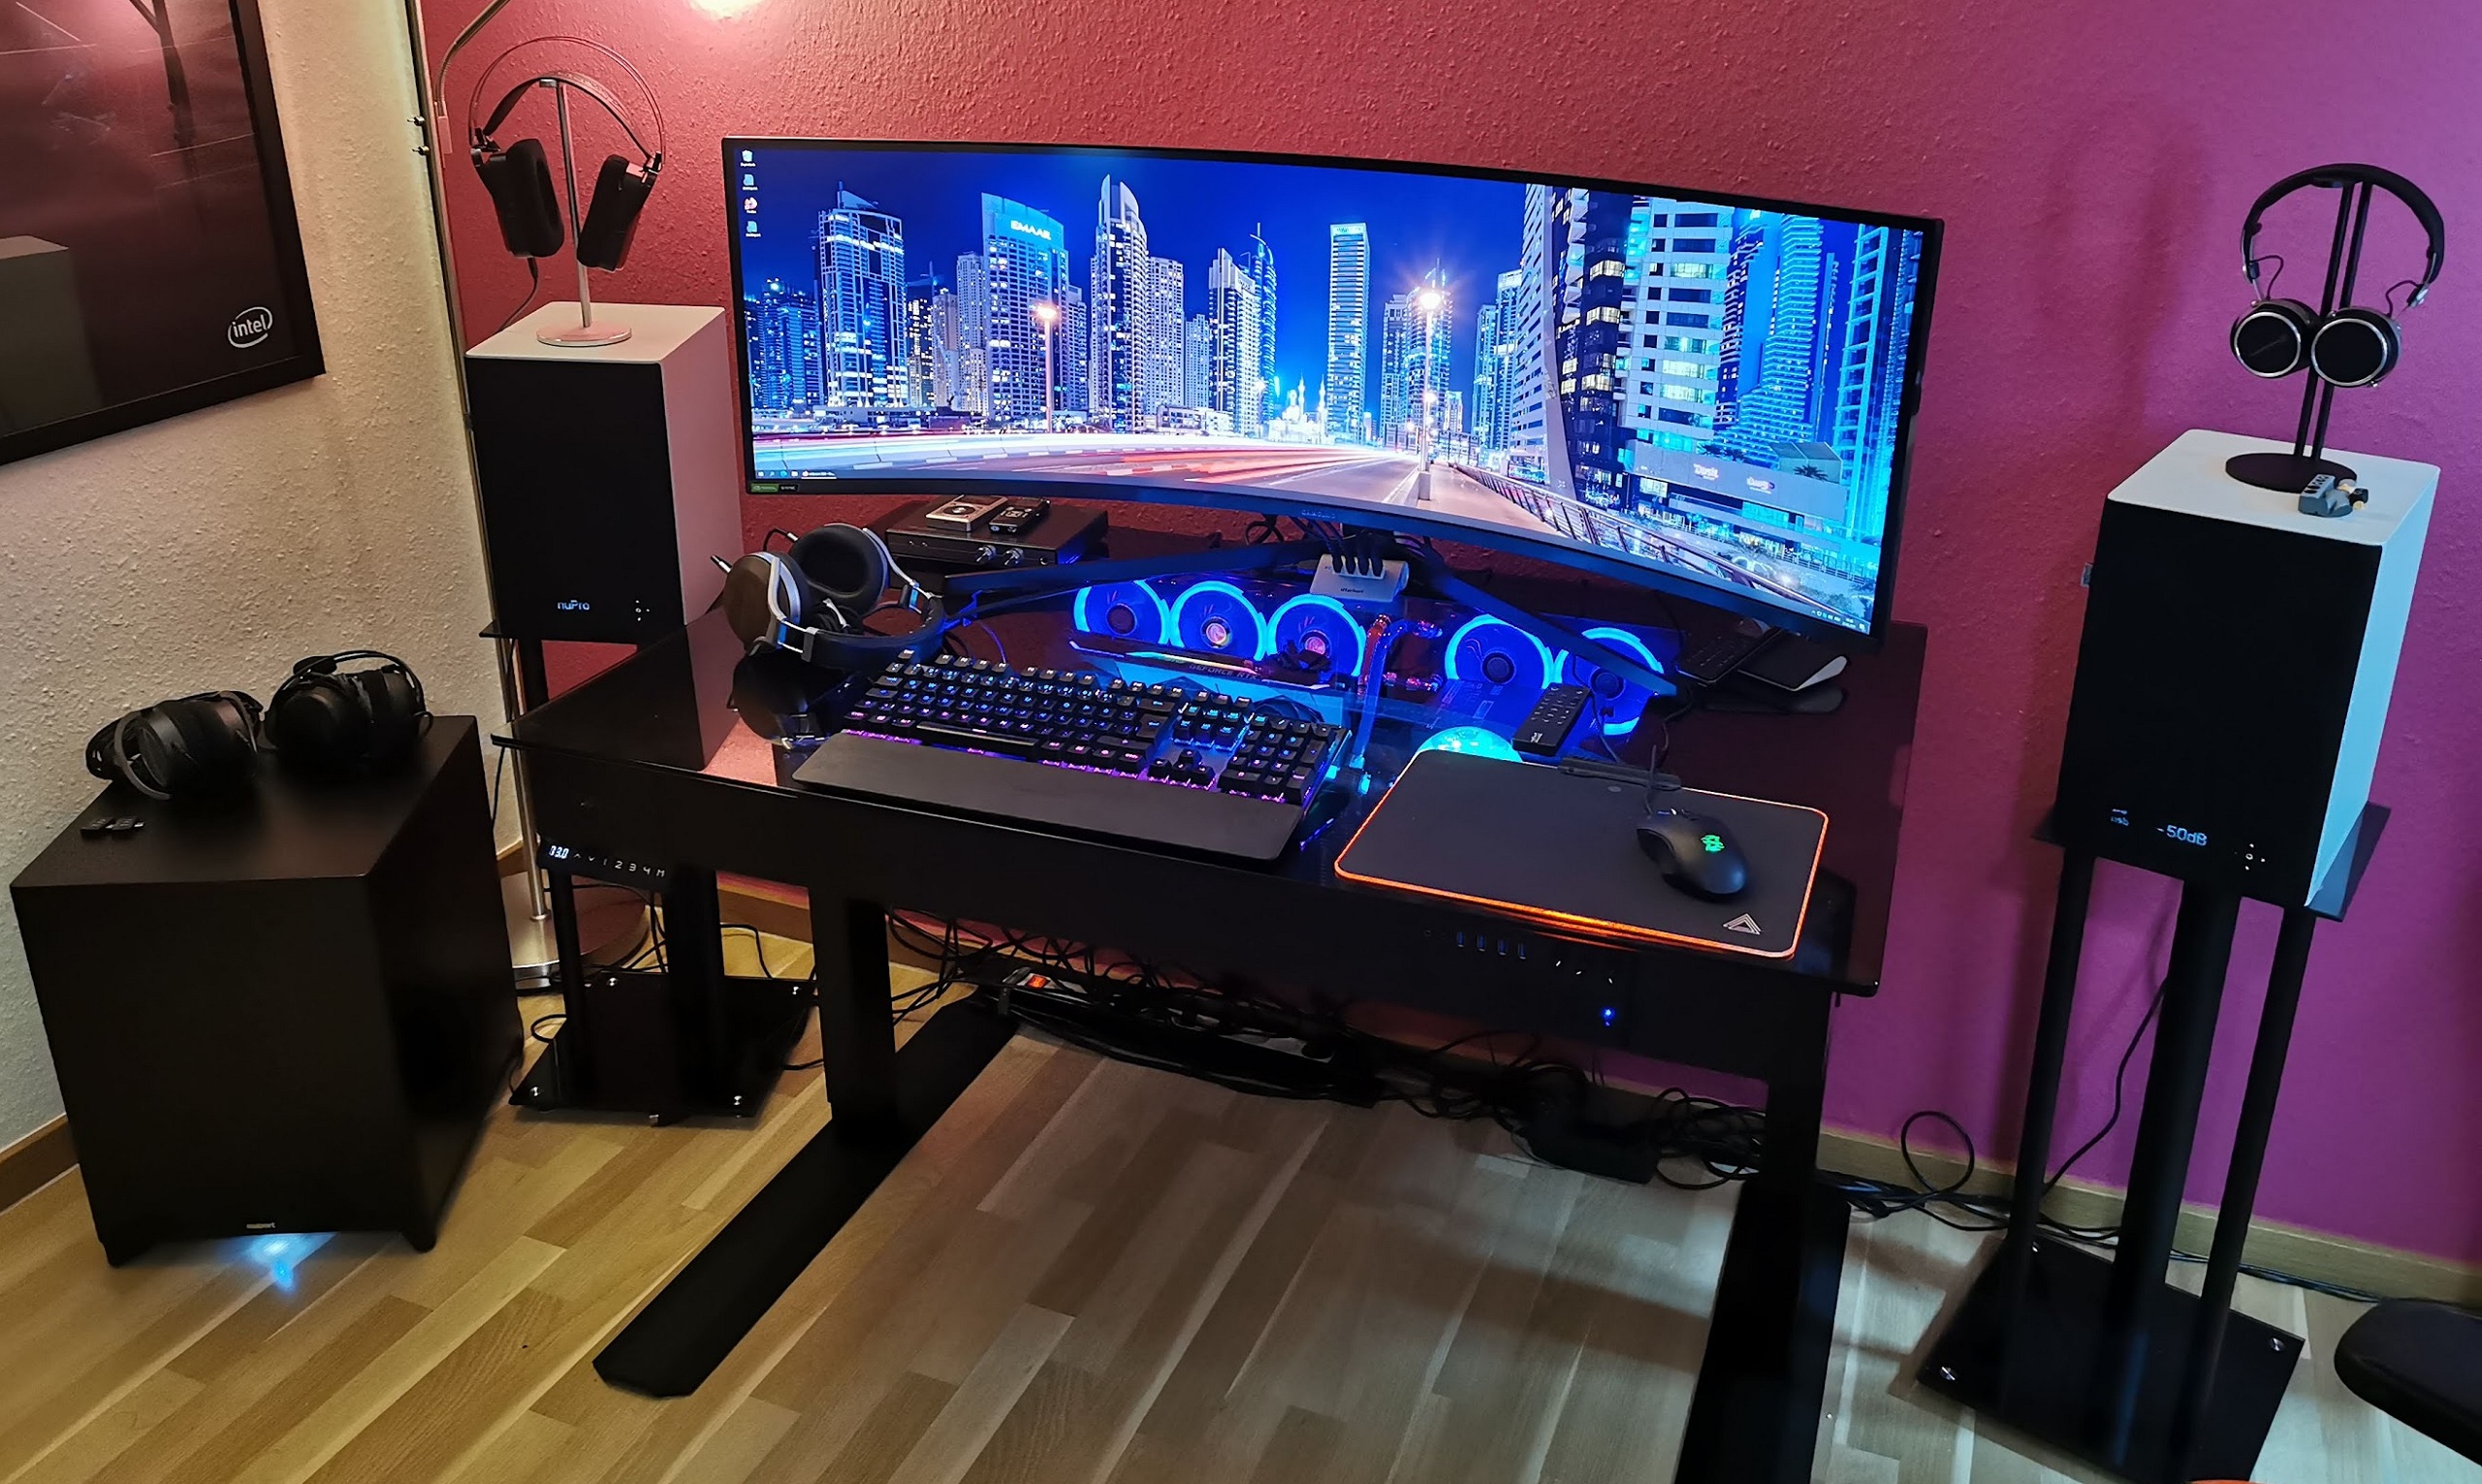
And if you’re wondering what I’ve put together with “old” SSDs (yes, I also buy my own SSDs for private use), I’ll take this opportunity to whet your appetite for the experience test with the Samsung Odyssey G9 (another Amazon “bargain”) in my new old gaming table, which I’ve recently started using not only for gaming (when there’s time), but also for rendering. That’s why there’s also a water-cooled and overclocked AMD Threadripper 3970X with a nice amount of RAM inside. By the way, the RGB illumination can easily be switched off at the push of a button.


Kommentar

Lade neue Kommentare

McHunter

Mitglied

25 Kommentare 4 Likes

Hmmm... warum nicht einfach ein Linux LIVE System (Knoppix/LinuxMINT o.ä.) von USB oder CD/DVD starten und dann mit dem dort vorhandenen Partitionsmanager denn MBR und alles andere auf der SSD Plätten?

Antwort 1 Like

komatös

Veteran

116 Kommentare 93 Likes

Also ich prüfe und bearbeiten grundsätzlich alle HDDs/SSDs, ob neu oder gebraucht, vor dem permanenten Einbau. Dafür braucht man keine teure Bezahlversion eines Partitionsmanagers. Hier reicht z. B. der AOMEI Partition Assistent.

Antwort Gefällt mir

Martin Gut

Urgestein

7,938 Kommentare 3,695 Likes

Das erinnert einem an die Momente, in denen man im BIOS 3 mal von CSM auf UEFI und wieder zurück stellt und immer wieder bootet. Und plötzlich geht, was vorher mehrmals nicht geklappt hat. o_O

Dafür habe ich noch Paragon Partition Manager 2012 rum liegen. Ich weiss nicht mehr, was der gekostet hat, aber es hat sich für mich schon längst gelohnt.

Antwort Gefällt mir

m
meilodasreh

Urgestein

572 Kommentare 284 Likes

Ich fürchte, das Problem werden relativ viele Nutzer "älterer Gurken" bekommen, wenn Windows11 als upgrade-Version breit verfügbar wird.
Als IT-affiner Mensch, der regelmäßig mal die einschlägigen Fachmagazine "blättert", bekommt man ja mit, daß Win11 den alten BIOS/Legacy boot modus nicht mehr unterstützen wird, und ein einfaches Umschalten auf UEFI bei alten Systemen und bestehender Win10-Installation nicht so einfach möglich ist...aber der 08/15 Nutzer, der das upgrade von Microsoft unter die Nase gerieben bekommt, weiß das sicherlich nicht.

Bleibt zu hoffen, daß die Installationsroutine das vernünftig im Vorwege abprüft, und nicht einfach drauf los installiert, und dann wie von Igor beschrieben unfertig stehen bleibt, ohne vor und zurück.

Antwort Gefällt mir

komatös

Veteran

116 Kommentare 93 Likes

Hier darfst Du mal nachschauen ob deine "alte Gurke" noch unterstützt wird.

Antwort Gefällt mir

Igor Wallossek

1

10,454 Kommentare 19,547 Likes

Weil die Hürde für ded, der dieses Problem erstmalig sieht und nicht lösen kann, sicher mindestens genauso hoch liegt. Knoppix dürften 2% der User kennen, falls überhaupt. Hier geht es ja nicht um Freaks, sondern Otto Normaluser :)

Antwort 1 Like

Igor Wallossek

1

10,454 Kommentare 19,547 Likes

Mein aktueller Threadripper samt RTX 3090 ist leider nicht geeignet :D

Antwort Gefällt mir

M
McFly_76

Veteran

397 Kommentare 136 Likes

Alle wichtigen "Werkzeuge" bietet mir Hiren's BootCD PE auf 'nem USB Stick ;) https://www.hirensbootcd.org/download/

Antwort Gefällt mir

Q
QuFu

Veteran

163 Kommentare 52 Likes

Ich hatte neulich auch eine Hand voll solcher SDDs ominöser Herkunft bekommen, die sollten hauptsächlich zu USB-SDDs umfunktioniert werden. Schon die Datenträgerverwaltung von Windows konnte damit nichts sinnvolles machen. Ich nehme dann aber meist DISKPART, um da mit der Brechstange alles runterzuwerfen. Das geht schnell und erfordert keine extra Programme. Und außerdem ist es auch noch in dem Windows PE vom Windows-Setup enthalten, mit Shift+F10 also gleich im Setup verfügbar.

Die Verteilung im Screenshot sieht für mich aber sehr verdächtig aus, da die Reihenfolge der Partitionen völlig durcheinander ist. EFI (System) sollte am Anfang stehen und Recovery am Schluss. Wer zur Partitionerung eines Windows-Datenträgers mehr wissen will, hier offiziell von MS was dazu. Dort gibts sogar ein DISKPART-Skript für solche "schweren" Fälle, hab ich aber noch nicht ausprobiert.

Antwort 1 Like

Göran

Veteran

155 Kommentare 63 Likes

Also wenn du nur die Paritionstabelle löschen willst, dann boote irgendein Live-Linux. Führe dd if=/dev/zero of=/dev/diessd bs=1M count=16.
Damit werden die ersten 16MB mit Nullen überschreiben. Eigentlich sollte das erste MB reichen, aber mit 16 MB ist man auf der sicheren Seite :).
Wichtig! sicherstellen dass das richtige Device angesprochen wird. Am besten im Bootlog schauen. Wenn nur eine Festplatte verbaut ist, brauch man natürlich nicht schauen.

Antwort Gefällt mir

big-maec

Urgestein

908 Kommentare 537 Likes

Hatte letzten auch Probleme mit einer NVMe Partitionen zu löschen bzw. wieder Clean zumachen. Diskpart war auch hier meine Wahl, allerdings sollte man da schon wissen was man da macht. Die Aktionen werden ohne Nachfrage sofort ausgeführt.

Antwort Gefällt mir

F
Fazzo

Mitglied

32 Kommentare 6 Likes

Ich habe die Paragon HDD Suite 2015 u. Ich liebe dieses Tool, nicht nur, dass man damit hervorragend Backups von kompletten Laufwerken incl. aller darauf befindlichen Partitionen machen kann - man kann von einer HDD/SSD/USB-Stick auch alle möglichen vorhandenen Partitionen während der Vorbereitung einer Installation löschen.

Antwort Gefällt mir

K
Kobichief

Urgestein

673 Kommentare 204 Likes

Auch diskpart Fraktion hier, wenn das nix hilft dban. Dachte eigentlich gebrauchte müssen immer einmal gewiped werden, wegen event. vorhandener Persönlicher Daten.

Antwort Gefällt mir

komatös

Veteran

116 Kommentare 93 Likes

Vermutlich ist das System so schnell, dass die Fenster von alleine auf und zu gehen. 🤣 😂

Antwort Gefällt mir

B
Besterino

Urgestein

6,886 Kommentare 3,455 Likes

@Igor Wallossek

Beim nächsten Mal ein Versuch wert:

Vor der eigentlichen Installation sobald das Windows-Installationsmedium gebootet hat:
"shift + F10" drücken,
Diskpart
richtige disk (select disk #) auswählen
ggf. mit list disk / detail disk überprüfen (auf * am richtigen Datenträger achten)
"clean" eingeben, gefolgt von
"convert gpt"
2x "exit"

Dann mit Installation normal fortfahren.

Diskparts "clean" wiped alles auf dem Datenträger, inklusive boot-record - quasi "Werkszustand". "clean all" für ganz Vorsichtige nullt den Datenträger noch zusätzlich, dauert aber. Empfiehlt sich vielleicht, wenn man Zweifel an der Größe oder sonstigen Tricksereien bei einem Schnäppchen hat... ;)

Wenn's irgendwie geht, bleib ich gerne bei den Windows-Bordmitteln oder zur Not kleinen Microsoft Helferlein (z.B. disk2vhd). Bei 3rd Party Zusatztools hab' ich mit den miniTools gute Erfahrungen gemacht.

EDIT & Nachtrag: Du solltest zu Windows 11 dann aber auch in die richtige Liste gucken (AMD wirst Du bei "supported Intel Processors" wohl nicht finden): :P ... da sind die 3000er TR immerhin drin:

Antwort Gefällt mir

Klicke zum Ausklappem

Danke für die Spende


Du fandest, der Beitrag war interessant und möchtest uns unterstützen? Klasse!

Hier erfährst Du, wie: Hier spenden.

Hier kannst Du per PayPal spenden.

About the author

Igor Wallossek

Editor-in-chief and name-giver of igor'sLAB as the content successor of Tom's Hardware Germany, whose license was returned in June 2019 in order to better meet the qualitative demands of web content and challenges of new media such as YouTube with its own channel.

Computer nerd since 1983, audio freak since 1979 and pretty much open to anything with a plug or battery for over 50 years.

Follow Igor:
YouTube Facebook Instagram Twitter

Werbung

Werbung