


What you absolutely have to consider before switching to the pad!
On the next page I will describe in detail the correct procedure for the Burn-In, whereby the method used there presupposes a few, but all the more important things. Since we need a PC in idle mode, with nothing interfering in the background, we take care of any pending or timed Windows updates, remove/disable all the stuff from autostart, disconnect the network connection and restart the computer. Without these measures, such a burn in can unfortunately go horribly wrong later on and I’ll explain why later.
So please: First do everything and then dismantle the old radiator, be very careful with the IHS as well as the radiator bottom and clean it thoroughly with isopropanol without any scratches. Owners of an AMD CPU should not roughen the IHS, so that one does not tear out the caked CPU with the later removal of the cooler. But more on that later. It also works without sanding or even better, just because you leave everything as it is. This may sound a bit illogical at first, but it is completely correct.
Cutting to the correct size and securing the base
Let’s start with the pad. This is very easy to cut with regular paper scissors, almost as easy as regular tin foil. Since the pads almost always have a carrier and a protective foil, I also recommend to first draw the outer dimensions of the CPU on the protective foil (e.g. CD marker) and to cut it in one piece (fingerprints). It is important, as we know from the first page, to keep some distance to the edge (max. 1 mm) and, if necessary, also to bevel the corners so that nothing protrudes that could melt.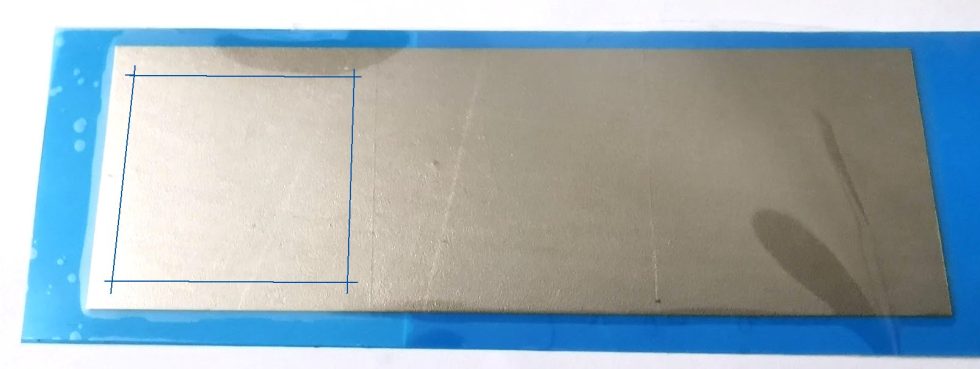
The next step is really important because it replaces the protective layer of varnish next to the foil against escaping metal, which is common with normal liquid metal tincture. We remember the drop on the previous page, but what can be done about it? What still works with graphics cards or a delidded CPU with such a varnish layer, will not work here on the socket. A layer of non-conductive thermal paste would certainly be possible, but would be an extreme mess, especially since there is a risk of it running into the BGA socket as well.
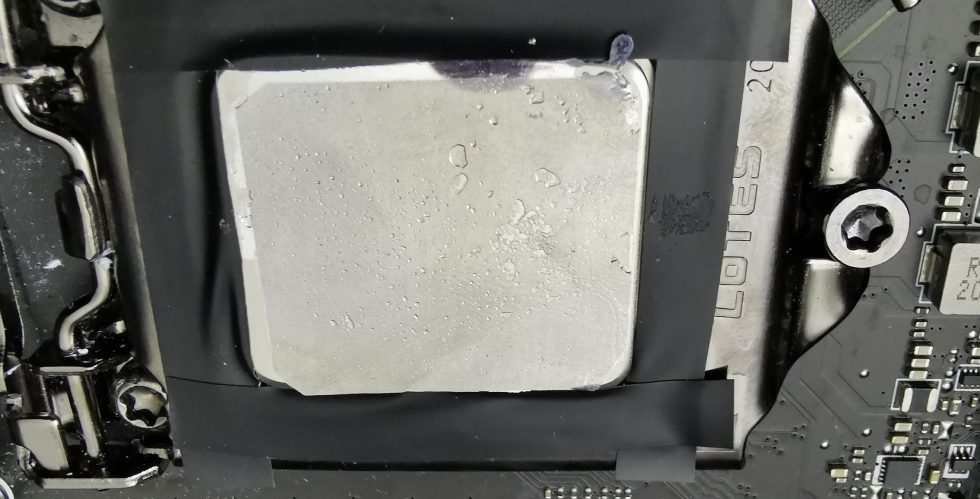
The best solution is normal insulating tape made of plastic (no textile!), which you can even stretch over the base of the IHS. The upper part of the IHS is left free, of course. If you make the ends a little longer, you can even pull off these protective strips again after the burn-in and a visual check. You can also leave it on, because the temperatures of the IHS are not harmful, because the melting point and flash point are much higher.

The picture after a successful burn-in shows that this protection makes sense. The solder on my pad slipped slightly in the picture when I removed the cooler, but you can see the solder coming out at the top right. I’ll explain in a moment why nothing sticks here, because the pad also has its certain peculiarities.
But how do we get the perfect burn-in without despairing at the end? Because usually you only have one try and buying more is expensive. But don’t worry, the whole thing is easier than you might think.


Kommentieren