


In the calm lies the power!
First, we operate the cooler as usual, i.e. with the pump running in the case of water coolers or with the fan running in the case of air coolers. After we have the PC idle and without network connection (Bluetooth please also off) in front of us, we start HWInfo64 and look for the monitoring for Tpackage, Tcase or Tdie, i.e. the temperature which is closest to the temperature of the IHS, depending on the used CPU, chipset and motherboard sensors.
On my Z590 board, for example, I take the value for the CPU from the Nuvoton sensor for the Core i9-11900K, which doesn’t react as nervously to load spikes and corresponds quite closely to the IHS temperature. If the PC is idle, a maximum of 25 to 40 watts of package power should be read out, anything below that will take forever and anything above that will be too fast. This is really where the only hurdle lies, because we have to do the burn-in really slowly. And this has a very trivial reason, which is unfortunately missing in all tutorials.
If I want to melt the pad, I need the IHS and cooler base to heat up as evenly as possible. If the IHS becomes much hotter than the still cold radiator bottom due to too high load, only a part of the pad will melt and the rest on the top below the too cold radiator will remain rigid and may even warp slightly. So on the one hand you have to generate enough heat, but on the other hand you don’t have to dissipate it. In my case with water block it takes about 8 to 10 minutes (pump is off), with tower coolers it goes a little faster and the curve steepens quickly.
The melting temperature of the solder is about 60 degrees. The Coollaboratory pad’s specification of 58 °C is not quite correct in that the pad starts to soften, but only really starts to melt and become liquid at about 60 °C. In addition, the melting process takes 1 minute or longer, depending on the pressure and heat applied. Meanwhile you have to keep an eye on HWInfo64 to make sure that the package temperatures do not exceed 75 °C and Tcore does not exceed 102 °C (Intel) or 92 °C (AMD). Otherwise the CPU throttles or there is an emergency shutdown or a BSOD.
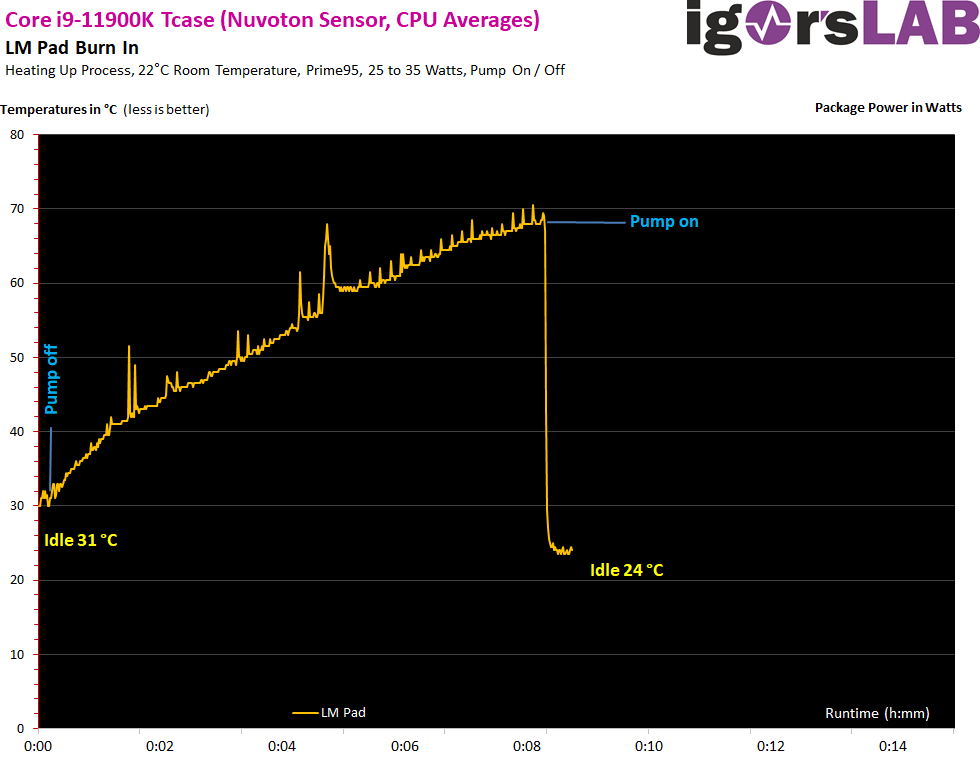
We can see from the curve that small spikes from the system load can occur from time to time. As long as these peaks don’t permanently exceed 50 to 60 watts, it’s still fine, but you have to be careful that it doesn’t last too long. Then you can also briefly activate the cooling system again for protection (for a short time!).
The curve (picture above) shows that the burn-in worked. My example relies on water with a temperature of 20 °C. In the initial state, the delta, i.e. the temperature difference in idle, is on average around 12 Kelvin, when the power dissipation was on average 30 watts. After burn-in, the value drops to a full 4 Kelvin, proving that everything worked!
Pay attention to the water temperature!
With acrylic water blocks, you really have to be careful that the water doesn’t start boiling, because that can cause thermal cracks and water leaks. I boldly simulated this for you once with an older system (please don’t copy!) after I had covered everything around the CPU with matching varnish. At 90 °C Tcase there was first a quiet crack and then a funny table fountain. So please don’t ultra heat it, it’s not UHT milk!
How the pad now performs in comparison to my best pastes in the lab, how to get it off again and why you don’t need to sand anything is on the next page


Kommentieren